Use smartctl to check SATA HDD and SSD.
08 Jul 2026, 13:30:37
SMART (Self-Monitoring, Analysis, and Reporting Technology) is a technology for self-monitoring, analyzing, and reporting on the status of a drive, supported by nearly every modern hard drive, SSD, or NVMe drive. During operation, the drive controller collects certain statistics about its status (temperature, working hours, errors, number of power-on cycles, and much more). This information can directly or indirectly indicate problems with the drive or its connection, and reveal signs of degradation leading up to complete failure of the storage device.In this article, we’ll explore how to use the smartmontools package, which is used to display SMART parameters, run tests, and automatically monitor the status of storage devices.
What is smartctl
smartctl is a utility from the smartmontools package used for manually diagnosing a disk and displaying information about it. The package also includes the smartd daemon, which automatically monitors the disk's status and notifies the user of any detected issues.Installing smartctl
The utility is installed by default on all dedicated servers provided by Virterion.com. You can install the smartmontools package from the system's standard repositories. All commands in the examples are run as the root user; otherwise, add the sudo command before the main command.Debian and Ubuntu
apt install smartmontoolsAlmaLinux, RHEL
dnf install smartmontoolsArch Linux
pacman -S smartmontoolsYou can check the version of the installed program using the following command:
smartctl --versionAs of this writing, version 7.4 of smartctl is available in the Ubuntu 24.04 repositories: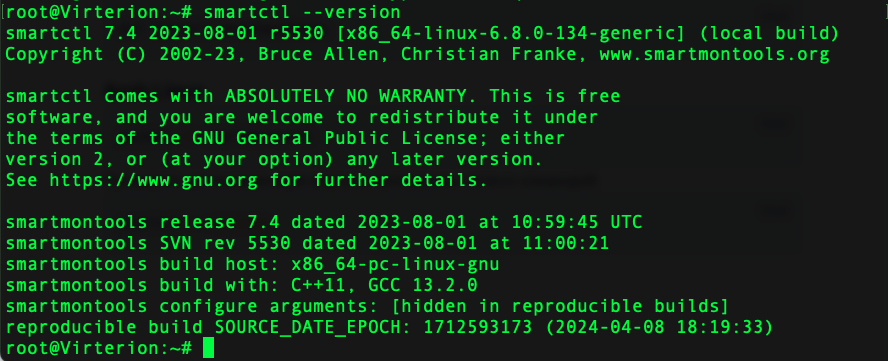
However, as of this writing, the current version of smartmontools is 7.5. To install it, you must compile the utility manually.
Compiling smartmontools from source
Let's install all the necessary dependencies. For Ubuntu and Debian, the command looks like this:apt update
apt install build-essential git autoconf automake libtoolDownload and unzip the archive containing the program:wget -q https://downloads.sourceforge.net/project/smartmontools/smartmontools/7.5/smartmontools-7.5.tar.gz && tar xf smartmontools-7.5.tar.gz
Compile smartmontools and install the package using the following commands:
cd smartmontools-7.5

./configure

make && make install
The build will take only a short time. Once it's finished, you can check the utility's version to make sure you've built the latest version:smartctl --version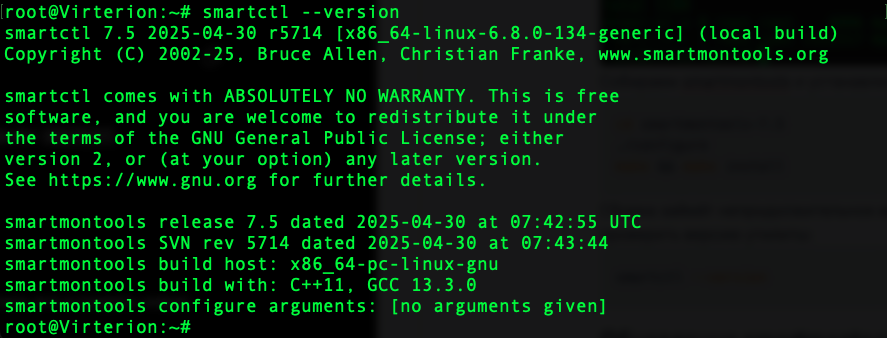
Update smartmontools
If you already have an older version of smartmontools installed, for example, from the system repositories, you can update it by compiling the program manually (as described in the previous chapter).After compiling a new version of the program, simply replace the executable file with the new one. You can locate it using the following command:
whereis smartctlOn Ubuntu 24.04 it's /usr/sbin/smartctl.
Let's create a link to the executable file for the new version of the program, replacing the old one:
ln -sf /usr/local/sbin/smartctl /usr/sbin/smartctl- -s - create a symbolic link;
- -f - delete the file at the path specified by the link, if it exists.

Identifying Drives
Using smartctl, you can list all the drives on the system that the utility can work with:smartctl --scanThe command displays a list of the devices found and the recommended device type.
Disk Information
You can view information about the storage device using the following command:smartctl -i /dev/sda- /dev/sda - disk name.
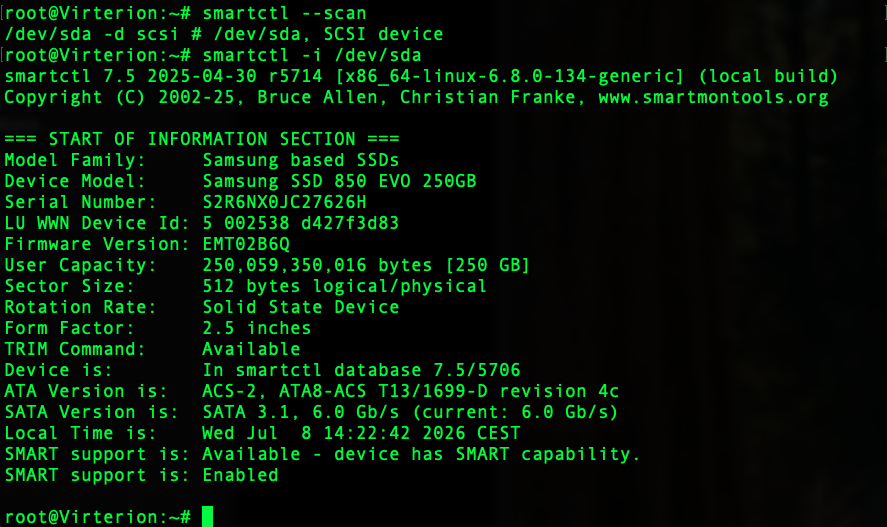
Main Fields:
| Rotation Rate | HDD spindle speed (SSD used as an example) |
| TRIM Command | TRIM support (for SSDs only) |
| Device is | information about the drive model is available in the SmartMonTools database |
| SATA Version is | supported SATA standard versions and data transfer rates (supported and used) |
| SMART support is | two lines with the same name: the first ("Available - device has SMART capability") indicates that the drive itself supports SMART technology, while the second ("Enabled") indicates whether SMART is enabled or disabled. |
Turn on SMART
If, when checking the disk information, you see the line "SMART support is: Disabled":
You need to enable SMART for the storage device:
smartctl -s on /dev/sda
It's also a good idea to enable automatic disk testing right away:
smartctl -o on /dev/sda
And saving parameter values to non-volatile memory:
smartctl -S on /dev/sda
Complete Information About the Drive
To display all SMART data for the drive for diagnostic purposes, use the following command:smartctl -a /dev/sdaOverall disk condition
Earlier, we looked at the attributes of the “START OF INFORMATION SECTION” block; now let's look at the “START OF READ SMART DATA SECTION” block.The first line, “SMART overall-health self-assessment test result,” indicates the drive's overall “health.”
You can also display it using the command:
smartctl -H /dev/sda
A “PASSED” result indicates that the drive controller did not detect any critical SMART attributes exceeding their thresholds, which would indicate an imminent drive failure. However, this does not mean that the drive was error-free or in good condition.
The "FAILED" status indicates that the disk is in a critical condition. In this case, you should transfer your data as soon as possible and replace the failed disk.
General SMART Values
The "General SMART Values" section contains information about the progress of testing, the estimated duration of checks, and the status of offline tests.SMART disk attributes
The SMART attribute block contains a table of attributes and values, which we will discuss in more detail below. These are partially standardized and may vary by manufacturer; we will cover the most basic ones.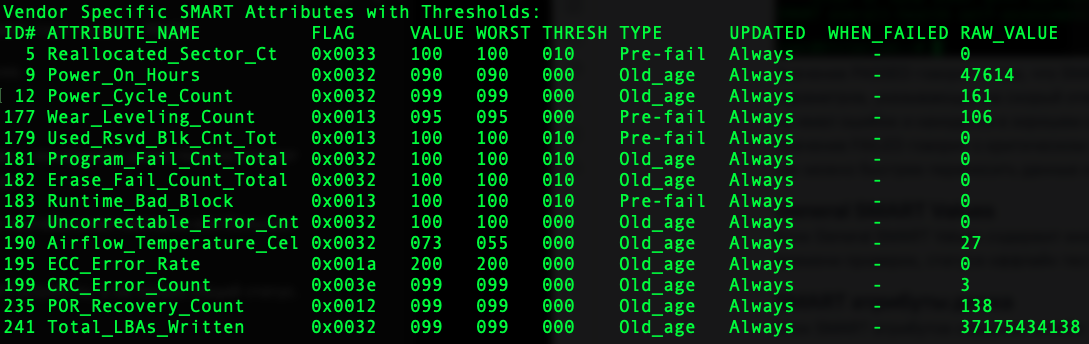
Let's break down the main columns in the table below:
| ID | attribute identifier |
| ATTRIBUTE_NAME | attribute name |
| FLAG | an array of bit flags describing the attribute's properties |
| VALUE | the current normalized value of the attribute (typically between 1 and 253) |
| WORST | the lowest VALUE ever recorded by SMART |
| THRESH | the VALUE threshold, upon reaching which the overall status of the medium will change to FAILED |
| TYPE | attribute type (Pre-fail - attributes that determine the overall condition of the disk; Old_age - operational metrics) |
| UPDATED | attribute update (Always - automatic, Offline - during tests) |
| WHEN_FAILED | when the attribute crosses the THRESH threshold ("-" means never) |
| RAW_VALUE | initial value of the attribute |
Let's take a look at the SMART Attributes:
| Reallocated_Sector_Ct | the number of sectors (blocks) that were marked as defective and replaced with spare ones |
| Power_On_Hours | number of working hours of the drive |
| Power_Cycle_Count | number of turns |
| Wear_Leveling_Count | the degree of memory "wear" (for Samsung and Intel, the higher the value, the better) |
| Used_Rsvd_Blk_Cnt_Tot | number of reserve blocks used |
| Program_Fail_Cnt_Total | number of errors when writing data to memory cells |
| Erase_Fail_Count_Total | number of memory cell erasure errors |
| Runtime_Bad_Block | the number of faulty blocks detected during routine operations |
| Uncorrectable_Error_Cnt | the number of unrecoverable errors (the controller was unable to recover data when reading from or writing to a damaged memory sector) |
| Airflow_Temperature_Cel | disk temperature |
| ECC_Error_Rate | the number of errors corrected by correction algorithms |
| CRC_Error_Count | the number of interface errors (errors in data transmission between the disk controller on the motherboard and the disk itself) almost always indicates a problem with the drive's connection cable or connector |
| POR_Recovery_Count | the number of times the disk has recovered after an unexpected power loss |
| Total_LBAs_Written | an important indicator of a drive's lifespan; specifically, it indicates how many logical blocks have been written over its entire lifetime. It is from this figure that the TBW specified by the manufacturer can be calculated |
SMART Error Log
If the disk is in good working order, you will see the message "No Errors Logged" in the error log section. However, if any entries appear there, this is a reason to run a full disk test and then replace the disk. As a rule, almost any error in the log is a reason to replace the hardware, with the exception of very old errors and errors related to the connection (cable) or a power failure.You can view the error log separately using the command:
smartctl -l error /dev/sda
Disk Testing
The condition of the storage medium can already be assessed based on the attributes listed earlier, for example Reallocated_Sector_Ct, ECC_Error_Rate, Runtime_Bad_Block, Uncorrectable_Error_Cnt, and the error log. However, the final verdict on the storage medium is determined by the results of the tests described in the next section.
The smartmontools utility offers two types of tests:
- Short - a quick check (~2 minutes); the test verifies all major mechanisms, the cache, the disk controller, and portions of memory;
- Extended (Long) - full scan (~3 hours, depending on the disk); checks the same things as the "short" scan, plus every memory cell.
smartctl -t short /dev/sda- -t - test type (short or long);
- /dev/sda - disk name.
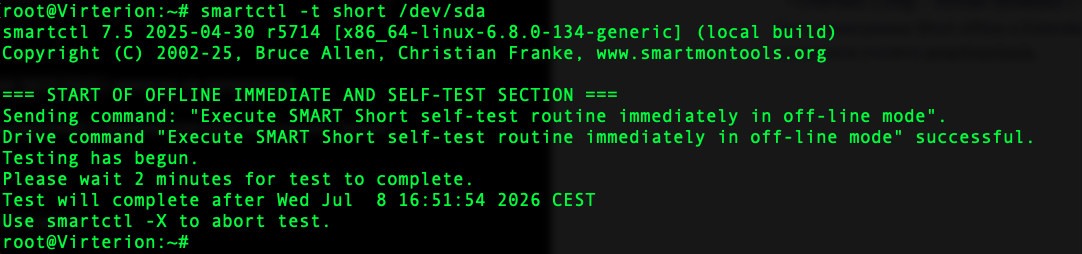
To display only the test results, you can use the following command:
smartctl -l selftest /dev/sda- /dev/sda - test drive.
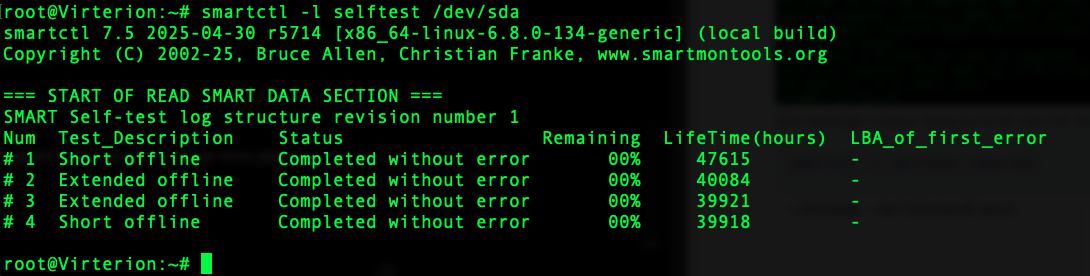
A quick test can be used to monitor the condition of your drives on an ongoing basis; a full test should be performed when a drive shows signs of trouble (deteriorating SMART metrics, decreased performance). Errors detected during a full drive test are a clear indication that the drive needs to be replaced. For this, you can contact our support team 24/7.
Conclusion
The smartmontools package serves as a foundation for disk testing and SMART parameter analysis, not only for Linux systems. It allows you to assess the health of SSDs, HDDs, and NVMe drives, detect early signs of device degradation, and prevent potential data loss. Running a quick test periodically and a full test at least once a month is a best practice for safe server management, especially when not using mirrored RAID arrays.If you are a Virterion.com customer, you don’t need to understand the intricacies of this utility; you can always contact our support team, and we’ll check the health of the drives on your dedicated server completely free of charge.